Getting Started
Requirements
nmConnect automates existing applications on your device. Please make sure you have the applications you are attempting to automate already installed. nmConnect currently has automations for the following applications:
- Telnet
- SSH
- Open Connect VPN
- goTeleport
MacOS has SSH installed by default but not Telnet. If you need Telnet it can be installed via
Homebrew. Once Homebrew is installed, you can
install Telnet using brew install telnet at the terminal.
To have nmConnect automate openconnect for Palo Alto Globalprotect or Cisco AnyConnect VPN, you can install the application using Homebrew.
To have nmConnect automate your connection to servers protected by goTeleport, you'll need the tsh client installed. Instructions are available at goTeleport.
Support for Apple Mac (both Intel and Apple Silicon) is available at launch. Linux versions of nmConnect will be available shortly after. Windows users will be able to use connect via Windows Subsystem for Linux (WSL).
nmConnect automatically updates itself when an update is available. Due to MacOS security requirements, your terminal application will need rights to "update other applications" for this to happen. You'll likely see a notification when you run nmConnect but if not, you can allow updates by adding your terminal application under System Settings -> Privacy & Security -> App Management
Installation
- Download the MacOS dmg file from the link provided with your purchase.
- Drag the Connect icon over to the Applications folder

- Add Connect to your system path. Add the following
line to your shell file:
export PATH=/Application/nmConnect.app/Contents/MacOS:$PATH
License and Configuration
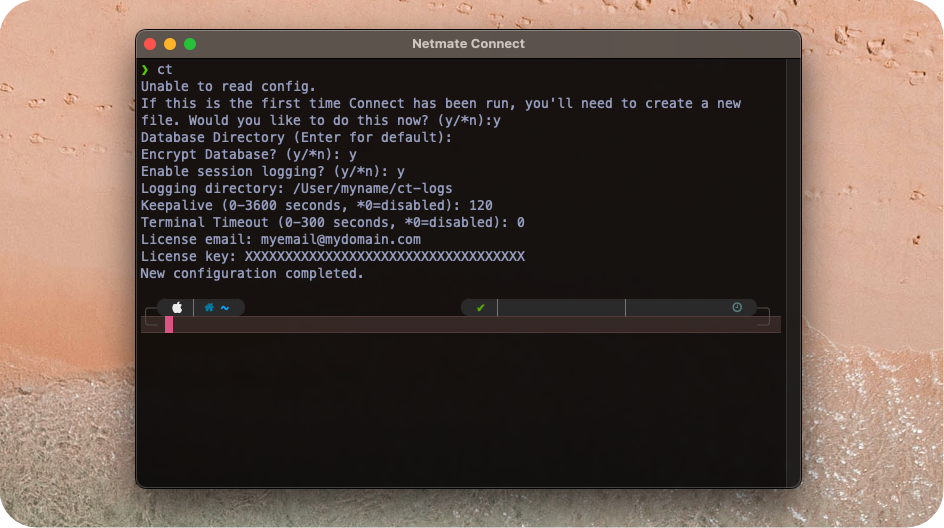
Before you can get started, Connect needs to create a configuration file and include
your licence information. To get this done, open up your terminal and type ct.
Connect will report that it can't find you configuration file and ask if you'd like to
create one. Type y at the prompt.

Options are as follows:
- Database directoryThe folder where all device information will be stored. By default this will be "~/Application Support/au.com.netmate/ct" but you can opt to change the location.
- Encrypt databaseEnsures all information about a device including usernames and passwords are encrypted with AES256. If you opt to encrypt the database, you will need to enter the encryption key each time Connect is run so that it can see the information.
- Enable session loggingConnect can log all output from a session to a directory of your choosing. Keep in mind that any passwords visible in your session will also be stored in the logs.
- KeepaliveEvery keepalive interval a ctrl-c is sent to the terminal to keep the session from timing out.
- Terminal timeoutHow long to wait for expected output before timing out.
- License information is emailed when a license is purchased.
Add Your First Device
Connect will search the database for partial name matches, so it is very helpful if you have a naming convention that will allow Connect to select devices based on customer and/or site. For example if you use a convention like "customer-site-deviceType", you can type the customer name/code and get a list of all devices for that customer.
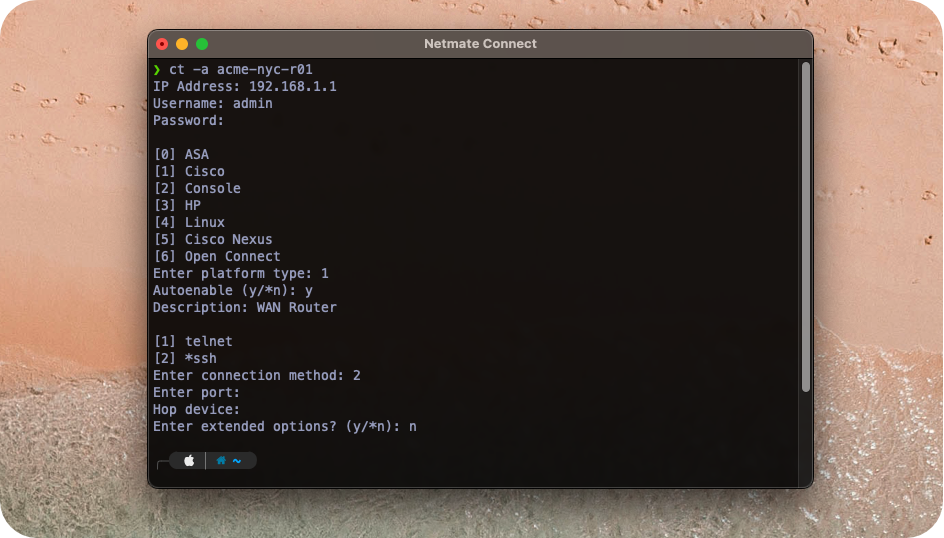
For example, if we have a customer called Acme with a router at a site in New York City we might call it acme-nyc-r01. A server at the same site might be called acme-nyc-s-web01.
To add a device simply use the -a flag and a name:

Most of the fields for adding a device are self explanitory but choosing the correct device type helps Connect know what kind of login prompts to expect as well as what commands to send if the device is used as an intermediate hop.
Connect to Your Device
Connecting is simple! Just type:
ct <name>
Editing a Device
Enter editing mode using the -e flag:
ct -e acme-nyc-r01
Intermediate hops
Connect can automate accessing devices behind jump hosts or other devices by chaining them together using the hop setting.
For instance, if an acme server has a private IP address that isn't accessible from your location and you can set the acme jump box as a hop.
Ensure the jump host is already in the Connect database, then while editing the router device select "Hop" from the list and enter the name of the jump box. Save your settings and you are ready to go!
When you now connect to the server, Connect will automatically access the jump box first, and then run the commands to connect to the target server from there - no need for any extra typing or information.
Backup Connections
In situations where backup links are in use, sometimes the IP address and method used to connect to a device might be different if a link is down. Connect has these situations covered by allowing you to specify a backup IP and connection information for every device. It is even possible to specify if an intermediate hop device should use its backup information thereby creating a backup pathway if required.

In the diagram above, connecting to the server when the primary link is down would require connecting to the firewall router on its backup link before connecting to the server.
To accomplish this, you would edit the server, select option 2 to edit the backup connection information, and set the "Hop" value to amce-nyc-r01. Then set the "Hop uses backup" option to true. Then save and exit.
Once the server configuration is complete, edit the router, select option 2 to edit the backup connection information, then set the IP address to the backup link address. Then save and exit.
Access the server using the -b flag and Connect will automatically connect first
to the router using the backup link and then to the server dropping you at the prompt,
ready to start work:
ct -b acme-nyc-s-web01